Working with text and subtitles in Premiere Pro can sometimes be a tedious task, especially when you need to change the font style for multiple text layers. If you’ve ever found yourself in this situation, you’re in luck! This tutorial will walk you through the simple steps to change the font of all your subtitles at once in Premiere Pro.
The Problem
Imagine you’ve spent hours creating text and subtitles for your video project in Premiere Pro. You’ve got everything perfectly timed and placed, but then you realize the font doesn’t fit your video’s aesthetic. The thought of changing each text layer individually is daunting. But don’t worry, there’s a solution!
The Master Text Style Feature
Premiere Pro offers a feature called “Master Text Style,” which allows you to create a style that can be applied to multiple text layers at once. This feature is a lifesaver when you need to make uniform changes to all your text layers.
Step-by-Step Guide
Step 1: Locate the Master Text Style
In your Premiere Pro project, locate the “Master Text Style” feature. You’ll find it in the “Essential Graphics” panel when you select a text layer (only 1 layer!). If you can’t see the Essential graphics panel, click on Window in the main menu and select Essential graphics from the dropdown.
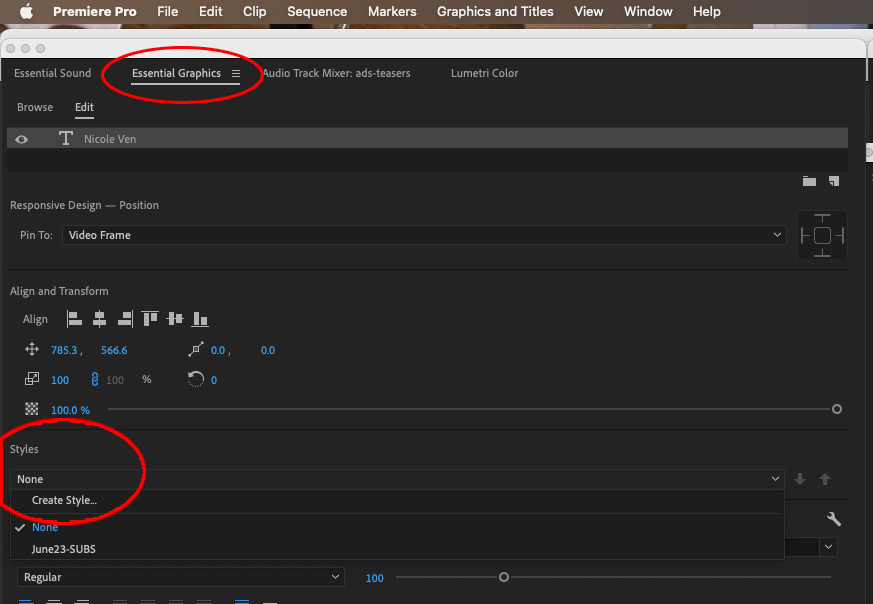
Step 2: Create a New Master Text Style
Click on the “Styles” dropdown and select “Create Style.” Name your new style; for example, “New Subtitles Style.”
Step 3: Customize Your Style
After creating the new style, you can customize it by changing the font, color, and other text attributes. These changes will be saved as part of the Master Text Style.
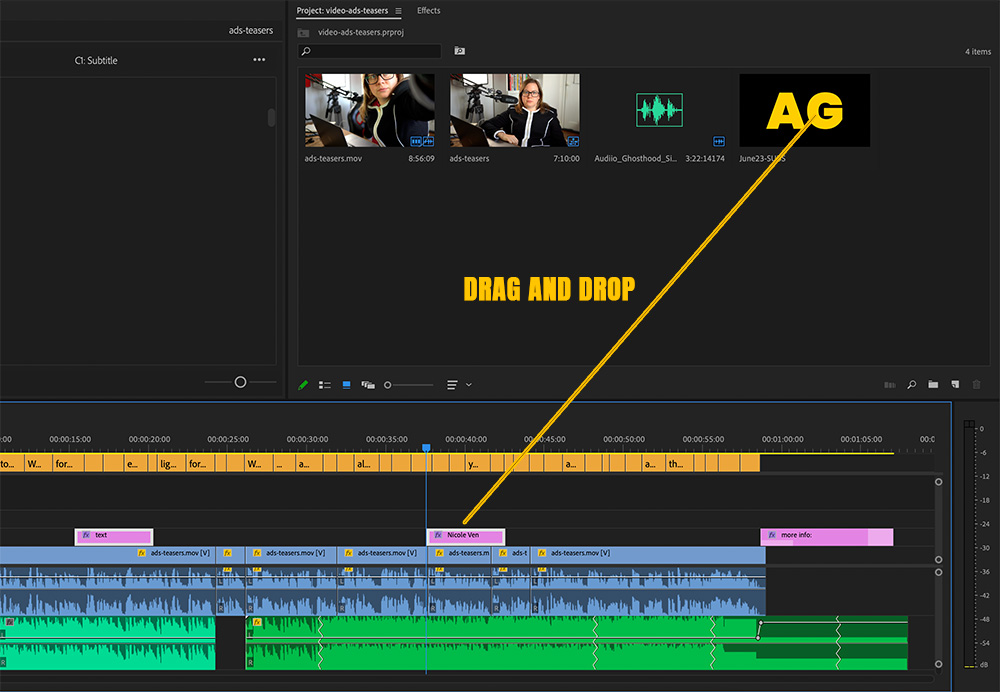
Step 4: Apply the Style to Text Layers
Once your new Master Text Style is created, go to the “Project Media” panel. You’ll find your newly created style there. To apply it to your text layers, simply select all the text layers you want to change and drag the new style onto them.
Important Note
While the Master Text Style will change the font, color, and other text attributes, it won’t change the position of the text layers. So if you’ve moved your text to the middle of the screen, for example, that position will remain the same.
Conclusion
Changing the font of all your subtitles at once in Premiere Pro is as simple as creating a new Master Text Style and applying it to your text layers. This feature is a huge time-saver and allows for greater consistency in your video projects. So the next time you find yourself dreading the task of changing each text layer individually, remember this handy feature.
Thank you for reading, and don’t forget to book a Zoom call with me to answer all your Premiere Pro questions.
Comments are closed