I’m excited to share with you a simple yet effective technique in audio panning in Adobe Premiere Pro CC. This technique allows you to move the audio from one ear to another, creating a dynamic sound experience for your audience. As a videographer and content creator, I know the power of audio in storytelling. It’s not just about the visuals; the sound plays a crucial role in creating an immersive experience.
What is Audio Panning?
Before diving into the how-to, let’s understand what audio panning is. In simple terms, audio panning in Premiere Pro allows you to control the distribution of sound across the left and right channels of your audio track. This can be particularly useful when you want to create a sense of movement or directionality in your audio, or when you want to focus the listener’s attention on a specific element of your soundscape.
If you want to become a much faster video editor, I have published a Premiere Pro pdf guide where I uncover hidden features of Premiere Pro, practical tips and tricks for speedy workflow.
The Beatles: Pioneers of Creative Audio Panning
When discussing audio panning, it’s impossible not to mention The Beatles, who were true pioneers in this field. Their innovative use of audio panning in the 1960s set a new standard in music production. At a time when stereo was still a novelty, The Beatles, along with their producer George Martin, experimented extensively with panning.
They often placed vocals entirely in one channel and instruments in the other, creating a distinctive and immersive listening experience. This technique was groundbreaking, as it added depth and dimension to their music, making songs like “Eleanor Rigby” and “Lucy in the Sky with Diamonds” not just auditory experiences but sonic adventures.
Their creative use of panning influenced countless artists and producers, and it’s a testament to the power of this technique in shaping the way we experience music. As a videographer and editor, drawing inspiration from The Beatles’ innovative approach can add a layer of sophistication and historical homage to your projects.
Step 1: Setting Up Your Project
First things first, open your project in Premiere Pro and locate the audio track you want to pan. If you’re new to Premiere Pro, it’s a powerful editing software that offers a wide range of features for both video and audio editing. For this tutorial, we’ll focus on the audio aspect.
Step 2: Accessing the Panning Controls
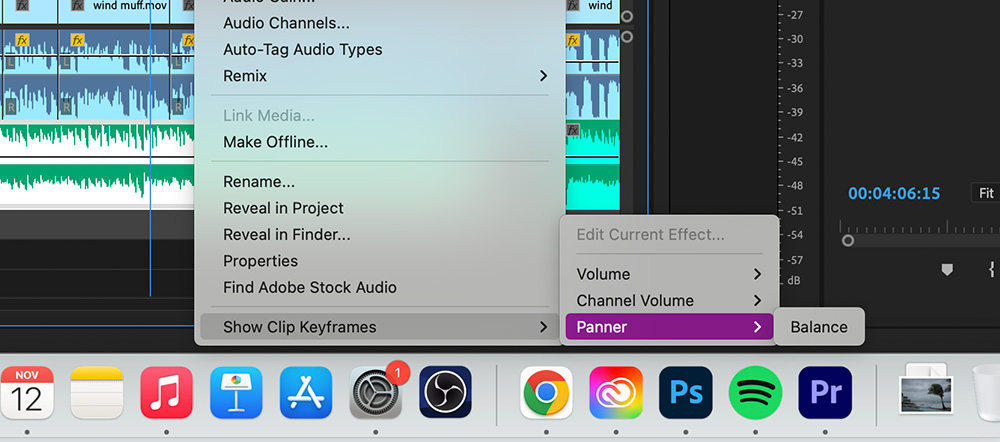
To start panning your audio, you need to access the panning controls. In your timeline, find the audio track you want to work with. You’ll notice two key elements labeled ‘L’ and ‘R’, representing the left and right channels. By default, your audio is set to control the volume levels. To change this to panning, right-click on the audio track, select ‘Show Clip Keyframes’, then choose ‘Panner’ and ‘Balance’. This switches the control from volume to panning.
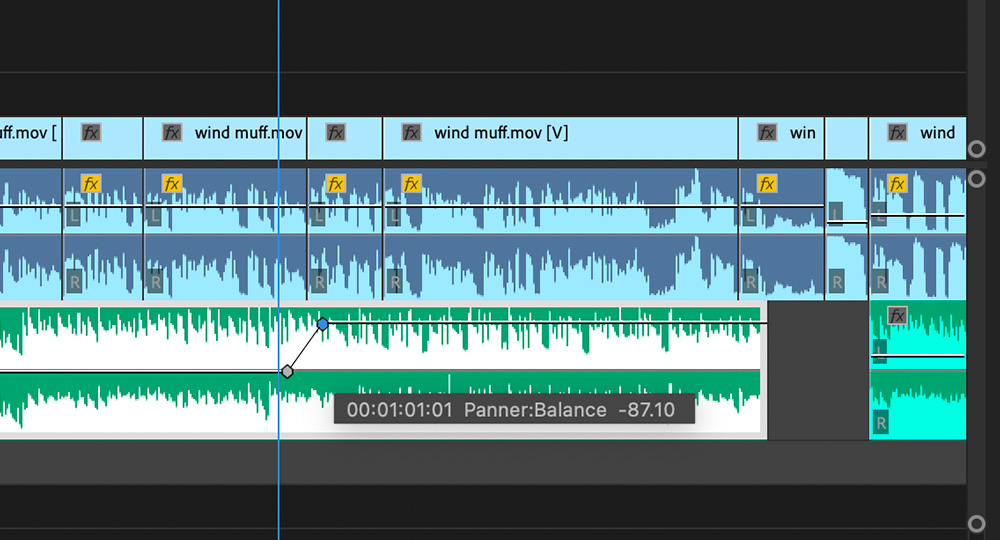
Step 3: Using the Pen Tool for Keyframes
With the panning control activated, it’s time to use the Pen Tool (or press ‘P’ on your keyboard) to create keyframes. These keyframes will dictate how your audio moves between the left and right channels. For instance, if you want the sound to start in the left channel and move to the right, you’ll place a keyframe at the beginning of the track, drag it upwards (towards the left channel), then place another keyframe where you want the sound to shift to the right channel and drag it downwards.
Step 4: Fine-Tuning the Transition
The beauty of this technique lies in its flexibility. You can adjust the length and intensity of the transition between channels by moving and manipulating the keyframes. If you want a quick transition, place the keyframes closer together. For a more gradual shift, spread them further apart. This allows you to create subtle nuances in your audio, enhancing the overall impact of your video.
Step 5: Experiment and Refine
The best way to master audio panning is through experimentation. Play around with different keyframe placements and listen to how they affect your audio. Remember, the goal is to enhance your video’s storytelling, so consider how the movement of sound complements the visuals. Does it add tension, excitement, or calmness? Does it guide the viewer’s attention in a specific direction? These are the questions that will help you refine your technique.
Tips for Effective Audio Panning
1. Context is Key: Always consider the context of your scene. If there’s a visual cue that suggests movement or direction, use audio panning to reinforce that.
2. Subtlety is Powerful: Sometimes, less is more. Subtle shifts in audio can be very effective, especially in dialogue-heavy scenes or when you want to create a sense of space and environment.
3. Experiment with Different Sounds: Not all sounds benefit equally from panning. Experiment with different types of audio, like music, ambient sounds, or dialogue, to see what works best.
4. Keep Balance in Mind: While panning can be a great tool, it’s important to maintain a balanced soundscape. Avoid overusing it, as it can become disorienting or distracting.
Conclusion
Audio panning in Premiere Pro CC is a simple yet powerful tool that can elevate your video projects. By controlling the movement of sound between the left and right channels, you can create a more dynamic and engaging audio experience for your audience. Remember, the key to effective audio panning is experimentation and subtlety. So, dive into Premiere Pro, start experimenting with your audio tracks, and see how you can enhance your storytelling through sound.
Learn all the hidden hacks and tips in my Premiere Pro PDF guide.


Comments are closed