If you’ve ever created subtitles in Premiere Pro and then realised the font looks terrible… you already know the pain.
There’s a way to change all subtitle fonts at once, and once you know it, you’ll never go back.
Want to edit faster in Premiere Pro?
If you’re constantly editing and want shortcuts like this (the ones that actually save time, not fluff), I put together a PDF with my best Premiere Pro tricks. I’d recommend printing it and keep it on your office table for reference.
Why this happens (and why it’s so annoying)
Premiere Pro doesn’t make this obvious.
Most people start editing captions individually, which is fine… until you need to change something globally like:
- font
- size
- colour
- style
That’s where things get slow.
But Premiere actually has a built-in feature designed exactly for this.
The fastest way to change all subtitle fonts at once
The trick is using Master Text Styles (or styles inside Essential Graphics / Properties depending on your version).
Here’s how to do it properly:
Step 1: Locate the Master Text Style
In your Premiere Pro project, locate the “Master Text Style” feature. You’ll find it in the “Essential Graphics” panel when you select a text layer (only 1 layer!). If you can’t see the Essential graphics panel, click on Window in the main menu and select Essential graphics from the dropdown.
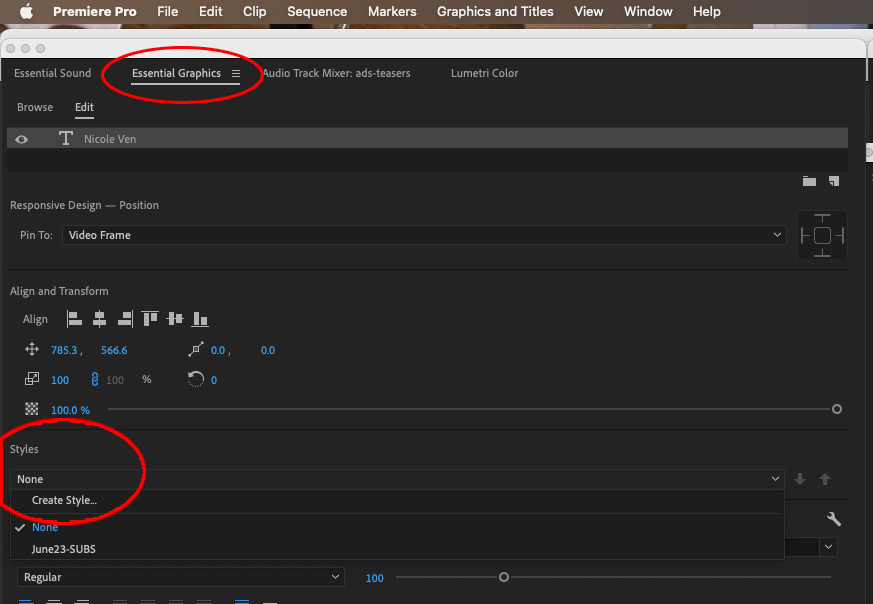
Step 2: Create a New Master Text Style
Click on the “Styles” dropdown and select “Create Style.” Name your new style; for example, “New Subtitles Style.”
Step 3: Customize Your Style
After creating the new style, you can customize it by changing the font, color, and other text attributes. These changes will be saved as part of the Master Text Style.
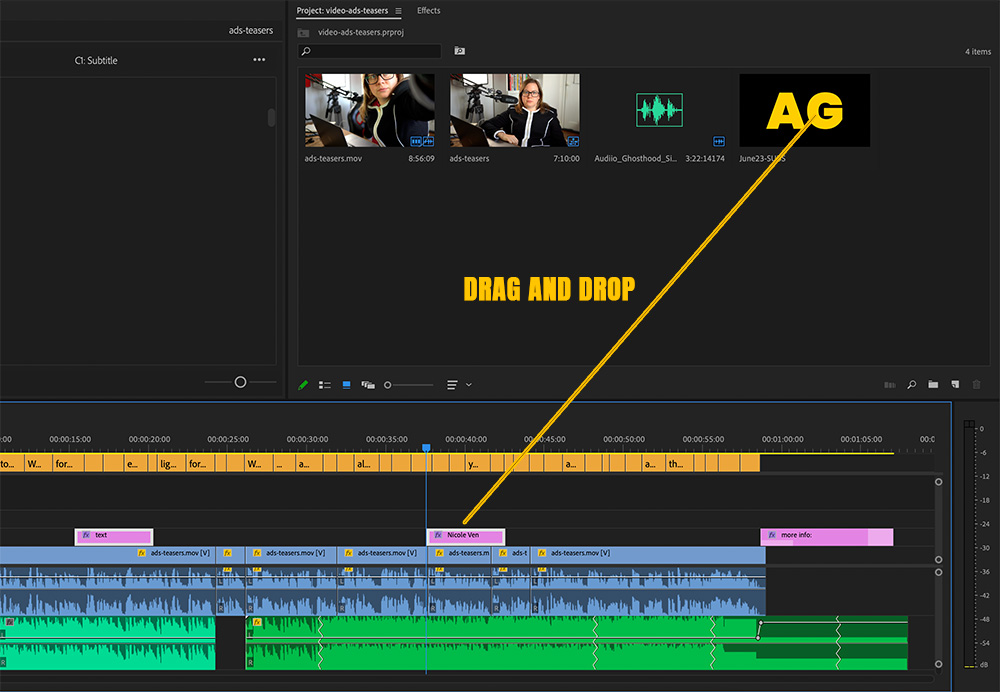
Step 4: Apply the Style to Text Layers
Once your new Master Text Style is created, go to the “Project Media” panel. You’ll find your newly created style there. To apply it to your text layers, simply select all the text layers you want to change and drag the new style onto them.
Important Note
While the Master Text Style will change the font, color, and other text attributes, it won’t change the position of the text layers. So if you’ve moved your text to the middle of the screen, for example, that position will remain the same.
Alternative method (newer Premiere versions)
In newer versions, you can also:
- select all captions in the timeline
- open the Properties panel
- change font directly
As long as you ONLY have captions selected, it applies to all of them at once
Why this matters (especially if you create content regularly)
If you’re doing:
- YouTube videos
- TikToks
- Reels
- hockey edits (your niche 👀)
You’ll be working with captions all the time.
Saving even 10–15 minutes per video adds up fast.
And more importantly:
your captions stay consistent → your content looks more professional.
Watch the full walkthrough (video)
If you prefer seeing it step-by-step, I break this down visually in the video above.
Comments are closed