Learn how to blur the background in your videos properly using the right lens, aperture, distance, lighting, and filming setup.
A blurred background can instantly make your video look more professional. Whether you are filming interviews, promo videos, YouTube content, or corporate videos, that soft background blur helps separate the person from the space behind them.
It also removes distractions. A busy office, random shelves, messy walls, plants, posters, cables, and general background chaos can make a video feel cheap even when the message is good. When the background is softly blurred, the viewer’s attention stays where it should be: on the person speaking.
This effect is often called bokeh or shallow depth of field. It sounds fancy, but the idea is simple. You want the subject to stay sharp while the background falls beautifully out of focus.
The problem is that a lot of people think this is just about camera skills. It is partly about skill, of course, but equipment matters too. You can know exactly what you are doing, but if you are using the wrong camera or lens, you may not be able to create proper background blur at all.
Why Blurred Backgrounds Look More Professional
When everything in your shot is sharp, the video can feel flat. The subject blends into the room, and the whole image starts to look more like CCTV footage than a polished video.
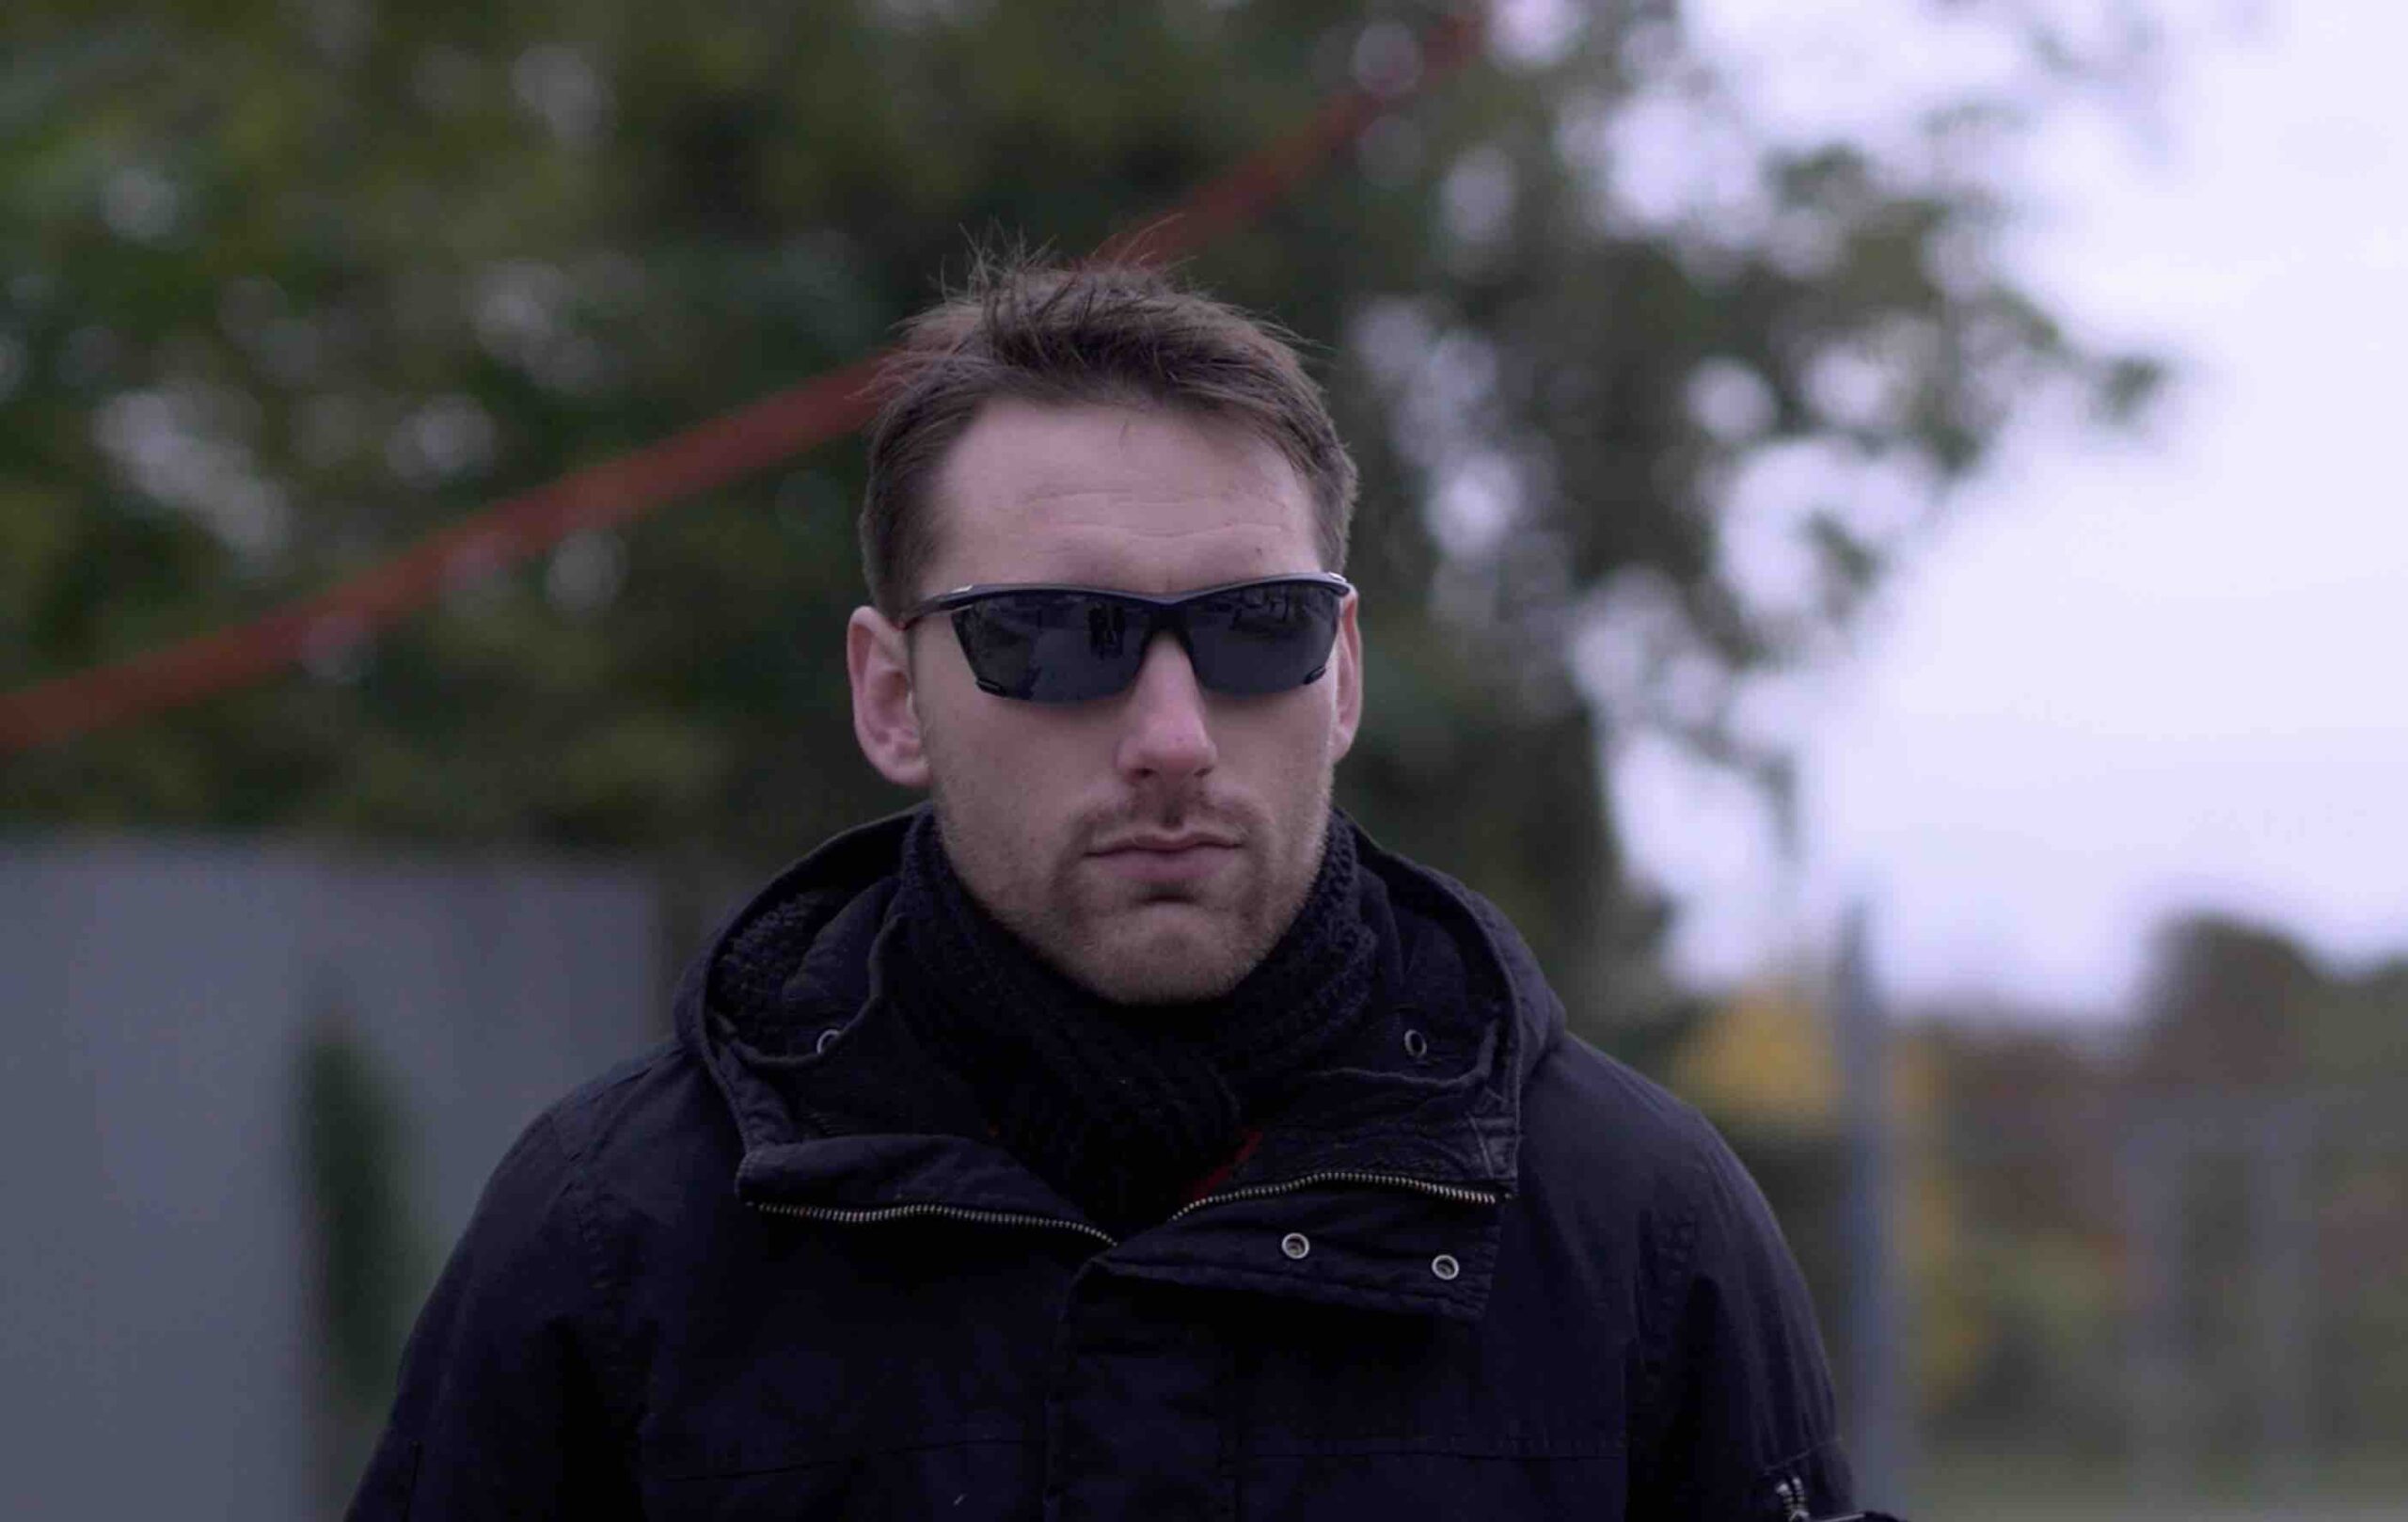
A blurred background gives your shot depth. It creates a clear difference between the person in front of the camera and the environment behind them. That separation makes the video feel more cinematic and intentional.
This is especially useful for interviews. If someone is sitting in an office, studio, meeting room, or business space, you usually want the viewer to focus on their face, not on whatever is happening behind them.
Even when people do not understand camera settings, they can still feel the difference. They might not say, “Oh, this has nice depth of field,” but they will often think the video looks cleaner, sharper, and more expensive.
Phone Blur Is Not the Same as Lens Blur
Yes, phones can blur the background. Cinematic mode, portrait mode, and AI blur can all create a fake version of the effect.
Sometimes it looks decent. For quick social media videos, it can be useful. However, it is not the same as real optical blur from a proper lens.
Digital blur is created by software. The phone or app tries to separate the subject from the background and then adds blur afterwards. That is why it can sometimes look weird around hair, glasses, hands, microphones, or the edges of the face.
Real lens blur happens naturally through the camera and lens. It usually looks smoother, cleaner, and more realistic because the camera is physically creating the depth of field while filming.
That is why professional interviews, documentaries, and high-end videos still rely on proper cameras and lenses instead of fake background blur. AI tools are improving, but real lens blur still has a much more natural look.
If you need help with improving the quality of your videos, work with me here. You will get clear feedback, practical improvements, content ideas, strategy advice, and equipment suggestions so you are not guessing anymore.
You Need the Right Lens
The biggest factor in creating a blurred background is the lens. If you are using a camera where you cannot change the lens, your options are limited. Some cameras and phones can create a bit of blur, but you will usually struggle to get that proper soft background look.
The number you need to pay attention to is the aperture. On your lens, it usually appears as an f-number, such as f/1.8, f/2.8, f/4, or f/5.6.
A lower f-number means the lens can let in more light. It also means the lens can create a blurrier background.
For example, f/1.8 can give you a very strong background blur. An f/1.2 lens can blur the background even more, sometimes too much. At that point, the image can start to look unnatural if you are not careful.
A lens around f/2.8 can be a great middle ground. It gives you enough blur to make the video look professional, but it does not completely destroy the background. You can still see some shape and context, which often looks more natural for interviews and talking-head videos.
If your lens only goes to f/4 or higher, background blur becomes harder. It is not impossible in every situation, but it usually requires more space, more control, and better positioning. For most people, it is not the easiest setup.
Check out my equipment recommendations on my Resources page.
You Do Not Need the Most Expensive Equipment
Good news: you do not need a ridiculously expensive lens to blur the background.
You need the right type of lens, not necessarily the most expensive one. There are budget lenses that can create beautiful background blur, especially if they have a low aperture like f/1.8.
Of course, a cheaper lens may not have the same sharpness, autofocus, build quality, or colour rendering as a more expensive lens. Still, if your main goal is to get that blurred background look, even a more affordable lens can make a huge difference.
This is where people often overcomplicate video production. They think they need a massive camera setup, a Netflix-sized crew, and a lens that costs more than their rent. In reality, a simple camera with the right lens can already improve the look of your videos massively.
Distance Matters More Than People Think
Even with the perfect lens, you still need distance.
This is one of the biggest mistakes people make when filming interviews. They put the person directly against a wall because there is a logo, a poster, a plant, or some “nice background” behind them.
Then they wonder why the background is not blurred.
For background blur to work, your camera needs separation between the subject and the background. The person should not be glued to the wall. They need space behind them.
Think of it like layers. The person is in the foreground. The wall, shelves, plants, or office space are in the background. If those layers are too close together, the camera does not have enough depth to work with, so everything looks flat.
Move the person away from the wall whenever possible. Even a few extra feet can help. The more distance you create between the subject and the background, the easier it is to get that soft, professional blur.
This is why high-end documentaries and interviews are often filmed in large rooms, studios, warehouses, or open spaces. The crew needs room for the subject, camera, lights, background, and everything else. You do not need a giant studio, but you do need enough space to create depth.
Small Rooms Can Make It Harder
Small rooms are tricky.
They are often better for sound because there is less echo, especially if the room has carpets, curtains, furniture, or soft materials. Visually, though, a tiny room can make it harder to create a professional-looking background blur.
If the person is sitting close to the wall and the camera is close to the person, the image can feel cramped. Even with a good lens, the background may not separate nicely.
A slightly bigger room usually gives you more options. You can move the subject away from the wall, position the camera better, place lights properly, and create a shot with more depth.
That does not mean you cannot film in a small room. You just have to be realistic. If the space is tiny, the blur may never look as strong as it would in a larger room.
Lighting Makes the Blur Look Better
A good lens helps you create blur, but lighting makes the whole image look finished.
When you use a low aperture like f/1.8 or f/2.8, your lens lets in more light. That can be great indoors, especially in offices or darker rooms where there is not enough natural light.
Still, relying only on room lighting is usually a mistake. Office lights can be ugly, flat, harsh, or too dark. They can also create strange shadows or make skin tones look bad.
One simple LED light can change everything. You do not always need a full lighting setup. Sometimes one good light on the face is enough to make the shot look sharper, cleaner, and more professional.
The funny thing is that you may not notice the difference until you compare it. You can film a shot without the light and think it looks fine. Then you switch the light on, record again, and suddenly the first version looks sad. Tragic, even. Very “filmed in a storage cupboard during lunch break.”
A small light can add that final touch. It makes the person stand out, improves the quality of the image, and helps the whole video feel more polished.
Be Careful When Filming Outside
Filming outside with a low aperture is a different challenge.
Because a lens with a low f-number lets in more light, bright outdoor conditions can quickly become too much. Your image can become overexposed, especially on a sunny day.
That does not mean you cannot blur the background outside. You can. But you may need extra tools, such as an ND filter, to control the light while keeping your aperture low.
Indoor interviews usually have the opposite problem. Instead of too much light, you often do not have enough. That is why bringing at least one LED light is a smart habit, especially when you do not know what the location will look like.
Real Blur vs AI Blur
AI background blur can be useful, but it is not magic.
If you already filmed a video and the background is distracting, AI tools can sometimes help soften it. For social media or quick edits, the result may be good enough.
However, it rarely looks as good as blur created properly while filming. The edges can look strange, the blur can feel artificial, and the image may not have that natural depth you get from a proper lens.
Most viewers may not know exactly what is wrong. They might not be able to explain that the blur is fake or that the separation looks off. But they can still feel that something is not quite right.
That is the same with editing, pacing, exposure, audio, and lighting. People may not know the technical reason, but they know when a video feels good. They also know when something feels cheap, even if they cannot name the problem.
The Best Setup for Blurred Background Interviews
For indoor interviews, the best setup is usually simple.
Use a camera with a lens that has a low aperture, ideally below f/4. Place the person away from the wall or background. Give yourself enough room between the camera, subject, and background. Add at least one LED light if the room is dark or the natural light is not flattering.
A 35mm lens at f/2.8 can work really well for this kind of setup. It gives a natural-looking blur without making the background disappear completely. If you want stronger blur, a lens like f/1.8 can create a more dramatic effect.
The key is balance. Too little blur can look flat. Too much blur can look unnatural. For interviews, you usually want the background to be soft but still believable.
Common Mistakes to Avoid
One of the biggest mistakes is filming someone right in front of a wall. No matter how good your lens is, the shot will struggle to look deep if there is no distance behind the subject.
Another mistake is expecting a phone’s cinematic mode to look the same as a real camera lens. It can look fine, but it is still digital blur. For professional interviews, a proper camera and lens will usually look better.
Poor lighting is another issue. A blurred background will not save a badly lit face. If the subject looks dull, underexposed, or flat, the whole video will still feel amateur.
Choosing the wrong lens can also ruin the effect. A lens with a high aperture number will make it much harder to blur the background, especially in a small room.
Finally, do not assume expensive equipment automatically fixes everything. A great lens still needs proper positioning, distance, light, and a decent room setup.
How to Make Your Videos Look More Professional
Background blur is one of those small details that can make a big difference. It is not just about making the background look pretty. It helps guide the viewer’s eye, creates depth, reduces distractions, and gives your video a much cleaner look.
The best part is that it is not as complicated as people think. You need the right lens, enough distance, decent lighting, and a bit of space. Once those things are in place, your videos can instantly start looking more polished.
And no, you do not need to film everything like a Netflix documentary. Most of us are not casually renting a warehouse for one interview because we are normal people with normal budgets. But even a slightly bigger room, one good lens, and one small LED light can make a massive difference.


Comments are closed